This is a machine-translated text that may contain errors!
Where does this information come from?
Much of this is just a retelling of Godot’s official documentation. Below you will find some useful links to the official documentation (which I would mostly recommend over what’s on Piggy here, but if you prefer using it that way then go ahead and use it!).
Useful Resources:
What about graphics, do I have to create them myself?
No! You can find a lot of free assets here:
Other Useful Links:
Other game engines?
If you prefer, you can use other game engines. Examples include:
There are many others as well, feel free to search if you want to try something else!
What is Godot?
Godot (Pronounced Guh-doh), is a ‘Game Engine’. To put it simply, it is a program that lets you create games (or regular programs if you want). Godot can do almost everything other game engines can do, both 2D and 3D.
Examples of games made in Godot: Godot Showcase
It is not just Indie games that have been made in Godot, Sonic Colors Ultimate is made with Godot! 🦔🦔🦔
How to get Godot?
You can download Godot from either of these sources:
- The official website: Godot Official Page
- Or on Steam: Godot for Steam
Simply download, install it, run it directly via Steam, execute the portable version if you prefer that option instead - whichever works best depending upon which path was chosen earlier above during selection phase before starting process itself now moving forward along journey ahead onwardwards continuously indefinitely eternally forevermore always onwards into future times yet unborn awaiting discovery through exploration journeys taken together side-by-side alongside companionship among friends family members loved ones dear souls cherished hearts beating within chests ribcages protecting vital organs pumping blood throughout bodies veins arteries capillaries connecting everything alive breathing feeling sensing perceiving experiencing existing being present here right NOW this very moment THIS EXACT SECOND ticking away clock hands spinning round dial face showing numbers indicating time passing by seconds minutes hours days weeks months years decades centuries millennia ages eons epochs eras periods intervals durations spans lengths extents ranges scopes scales dimensions magnitudes sizes widths heights depths thicknesses densities weights masses gravities forces energies powers strengths capabilities abilities talents skills proficiencies expertise knowledge wisdom understanding comprehension insight perception awareness consciousness mindfulness attention focus concentration dedication commitment devotion loyalty fidelity faithfulness trustworthiness dependability reliability consistency stability steadiness permanence endurance resilience toughness durability longevity lifespan lifetime duration existence life span period era age epoch aeon eternity infinity endlessness boundlessness limitlessness infinitude immensity vastness enormity magnitude greatness grandeur majesty splendor brilliance radiance luminescence glow shimmer sparkle glitter shine brightness illumination light luminosity clarity lucidity transparency translucency opacity density solidity firmness rigidity stiffness hardness softness pliability flexibility elasticity stretchability compressibility expandability contractility contraction expansion growth development evolution progression advancement improvement enhancement enrichment amplification intensification strengthening fortifying reinforcing bolstering supporting sustaining maintaining preserving conserving safeguarding defending guarding shielding protecting sheltering harboring hiding concealing masking disguising camouflaging blending merging fusing combining uniting joining linking connecting associating relating correlating matching aligning coordinating synchronizing harmonizing balancing equilibrating equalizing leveling flattening smoothing straightening rectifying correcting fixing repairing mending healing curing treating medicating pharmacologically therapeutically medically clinically professionally expertly skillfully adeptly proficiently competently efficiently effectively productively fruitfully successfully victoriously triumphantly gloriously magnificently splendidly superbly excellently perfectly flawlessly impeccably faultlessl
Set up a project!
When you start Godot, this window appears:
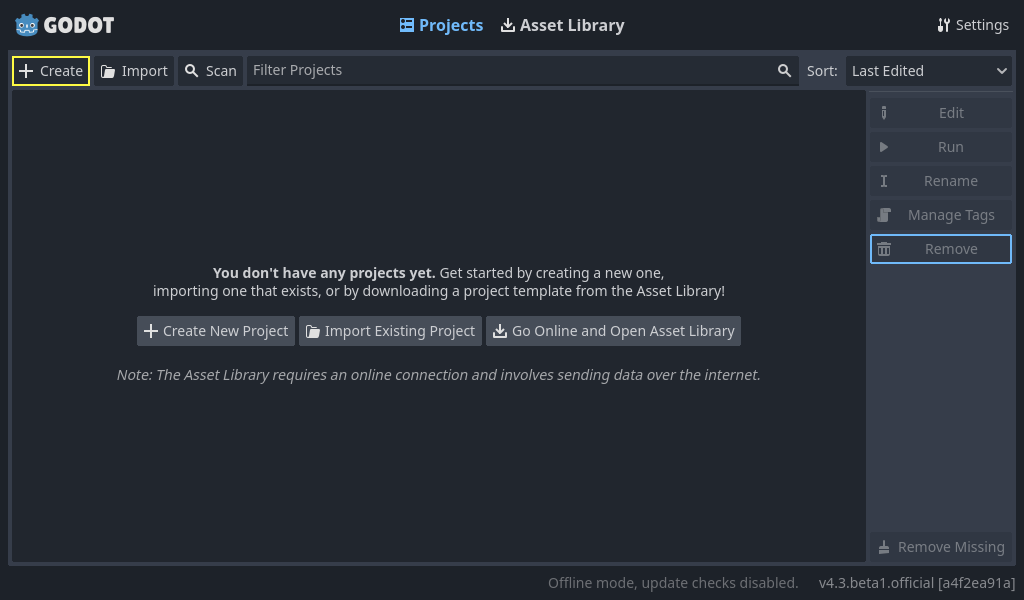
Here you are asked to choose between programming languages, GDScript or C#. GDScript is very similar to Python.
Differences between GDScript and Python (without colors):
def hello():
    text = "Hello world!"

    print(text)
func hello():
    var text = "Hello world!"

    print(text)
In Python, variables only require that you write the variable name directly. In GDScript, however, you must prefix them with var. To define functions, use func instead of def.
Scenes & Nodes
One of the most important concepts in Godot is Scenes and Nodes. We can start with nodes. A node is an object in Godot, and it can represent anything. It can be something representing a player, an enemy, a button in a menu, text on the screen, anything at all. Scenes are a collection of nodes.
Here we will create a very simple example.
Part 1a - Set up the “player” scene
At the top of the Godot window, click the “2D” button to change the view to a 2D view.
On the left side of the window, you see the following interface:
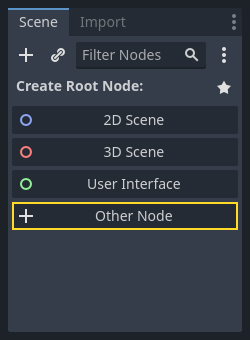
Click the “Other Node” button, and search for “CharacterBody2D”, select it and click “Create”. This is a node that is used for a 2D player. You might see that there is a warning triangle ⚠️ next to the “CharacterBody2D” node. This is because it is missing some things it would like to have.
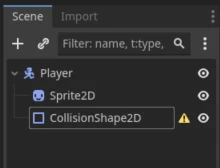
If you right-click on the node, there is a “+ Add Child Node…” button. Use this and add two nodes, Sprite2D and CollisionShape2D. Sprite2D is used to add some graphics to the player, while the other is used to check for collisions. You can also give them names if it makes it easier to keep track of things. I have given my CharacterBody2D the name “Player”. The scene should look like this now:
Part 1b - Fixing ⚠️ on CollisionShape2D
In this case, the warning triangle indicates that the CollisionShape2D is actually lacking collision detection. You can fix this by clicking on the node (on the left); a panel will appear on the right side with various properties you can modify about that node. Feel free to experiment with those settings here. However, we want to focus on setting the “Shape” property; set it to something like RectangleShape2D. This isn’t very important since we won’t be using collisions in this section anyway.
Part 1c - Adding a Sprite, Graphic
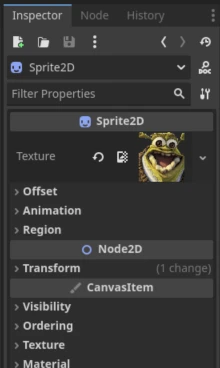
If you click on Sprite2D on the left, the field on the right appears, where it says “Texture”. Here you can put in an image for the player. Just drag and drop an image into the field.
This is what it will look like after adding a sprite.
Part 2 - Adding Input Checks
At the top of the window is a menu bar with options like “Scene,” “Project,” “Debug,” “Editor,” and “Help.” Click on “Project” followed by “Project Settings.” This will open a settings panel containing numerous configurations. Select “Input Map” to configure keyboard buttons here:
- In the “Add New Action” field, type “left” and then click “Add.”
- Next, add “right,” “up,” and “down.”
- These are referred to as Actions.
- For each action, you can assign keys using the “+” icon located at the far right side (see below).
Simply press any key(s), then confirm your selection via “Add”. Assign multiple keys per action if needed—this flexibility supports various control schemes efficiently while maintaining simplicity across all interactions involving directional inputs or movement mechanics alike within game design contexts where such mappings matter most during development stages too since they directly impact player experience overall regardless whether working alone collaboratively remotely locally offline online multiplayer singleplayer co-op competitive casual hardcore niche indie mainstream AAA retro modern classic timeless evergreen etcetera ad nauseam de gustibus non est disputandum et cetera sic transit gloria mundi
Part 3 - Adding a script to control the player.
To add game logic—that is, to interact with the player, background, or anything else in the game—we need a script. Scripts are code that can be written in two languages, GDScript or C#. GDScript is the default.
- Click on the “CharacterBody2D” node (I have named it “Player”).
- Press the “Attach Script” button (see below).
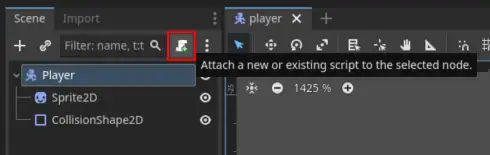
This will open a window where you can select the language (choose GDScript) and specify a file name/path (just leave it as the default suggested name, though you can rename it if desired). Then click forward again. This opens up a “Script” editor pane. There isn’t much here initially.
extends CharacterBody2D
The only thing this code says at the moment is that the code should belong to a node of the type “CharacterBody2D”, which is our player.
We will add a function here that we will use to manipulate the player:
extends CharacterBody2D

func _physics_process(delta: float) -> void:
    return
Physics Process?
_physics_process is a function that updates every single “frame”, i.e., around 60 times per second (default). There is another function that is simply called _process, which updates continuously. If you want the player to move at a steady pace, you use _physics_process.
This is where we will add code that moves the player.
Part 4 - Basic input
In part 2, you added input buttons; now we will use them. There is a built-in object called Input that we can use to check if the player has pressed something set up in the “Input Map.”
Try adding this code into your _physics_process:
if Input.is_action_pressed('right'):
    velocity.x = 100

move_and_slide()
What is move_and_slide()?
move_and_slide()is a built-in function in Godot that is used when we actually want to move what we apply it to. Without this, the player will not move.
Warning
The whitespace on lines is very important, this works like it does in Python.
What happens when you start the game by pressing the Play button in the Godot window, then press “right”?
If nothing is happening now:
- Did you remember to set up something in the Input Map?
- Did you write
rightand notRight? In other words, does exactly what you wrote in code match the name used for this action within your project’s built-in inputs list (the Project Settings -> Input Map)?
The entire code so far
extends CharacterBody2D

func _physics_process(delta: float) -> void:
    if Input.is_action_pressed('right'):
        velocity.x = 100

    move_and_slide()
Now try adding code for 'left', 'up', 'down'.
What should velocity.x be for left? What about up and down?
Entire code now
extends CharacterBody2D

func _physics_process(delta: float) -> void:
    if Input.is_action_pressed('right'):
        velocity.x = 100
    if Input.is_action_pressed('left'):
        velocity.x = -100
    if Input.is_action_pressed('down'):
        velocity.y = 100
    if Input.is_action_pressed('up'):
        velocity.y = -100

    move_and_slide()
Part 5 - Fixing the Code
You might notice that the player doesn’t stop when you release a direction. We can fix that now!
Before all the if-statements, add a line that sets the velocity to 0. You can do this by writing velocity = Vector2()
All speeds and directions in Godot are vectors, this is a math concept we won’t go into now, but if you want to learn more about what this means, you can go here: Wikipedia vectors.
The full code now
extends CharacterBody2D

func _physics_process(delta: float) -> void:
    velocity = Vector2()

    if Input.is_action_pressed('right'):
        velocity.x = 100
    if Input.is_action_pressed('left'):
        velocity.x = -100
    if Input.is_action_pressed('down'):
        velocity.y = 100
    if Input.is_action_pressed('up'):
        velocity.y = -100

    move_and_slide()
When you start playing now, you can move around with your character:
Furthermore, we should modify the code so that speed is no longer just a number but stored in another place instead.
For example, before the function, define a constant to keep track of the speed.
The final code with const
extends CharacterBody2D

const SPEED = 100

func _physics_process(delta: float) -> void:
    velovity = Vector2()

    if Input.is_action_pressed('right'):
        velocity.x = SPEED
    if Input.is_action_pressed('left'):
        velocity.x = -SPEED
    if Input.is_action_pressed('down'):
        velocity.y = SPEED
    if Input.is_action_pressed('up'):
        velocity.y = -SPEED

    move_and_slide()
Part 6 - Tinker around yourself!
If you go back to part one, Useful Resources, you can find out what you can continue tinkering with.
After this, try making your own game. What you make is up to you! If you want to create something completely new, go ahead! If you’d like to imitate a game that already exists, go for it! The best way to learn is by trying things out!